



On October 2, 2026, Lydia Hallie, who works on Claude Code, posted a one-line question: "have you built any claude code mods yet?" The replies were a mix of "yes, and it helps a lot," "not yet, I have four ideas and no free evenings," and one commenter's advice that if they started they would keep each mod tiny and in git, so that when the agent acts strangely you can switch them off one by one and see which did it. That is good engineering advice, and it is the approach this tutorial takes.
We will build a complete mod from nothing: Touched Files, which counts the files Claude has edited this session, shows the count in a band above the prompt, and adds a /touched slash command that lists them. It is small enough to read in one sitting and uses four of the most useful parts of the mod API: tool hooks, state, UI and commands. Every screenshot below is a real capture from a Claude Code session running this mod.
TL;DR — what you will build
| Question | Answer |
|---|---|
| What is the mod? | Touched Files: a counter band plus a /touched command |
| How big? | About 80 lines of TypeScript plus three small config files |
| Events used | session.start, tool.call, command.run, ui.render |
| Checks | claude plugin validate and claude plugin test, both passing |
| How to run it | claude --plugin-dir /path/to/touched-files |
| Prior knowledge | Basic TypeScript and React-style JSX |
| Time | 20 to 30 minutes |
If you want the concepts first, read our official TypeScript plugin guide and the community extensions overview. This post is the hands-on companion: one mod, built end to end.
What a mod is, in one paragraph
A mod is a plugin of function hooks. You call on(event, matcher, hook) to attach a function to an event, and each hook receives three things: $, the engine interface; e, the event's input; and next, which runs the plugins beneath yours and then the engine's own behavior. A hook that returns without calling next answers for itself. A hook that calls next({ ...e, change }) rewrites what everything below it sees. The module runs in its own sandboxed environment with no DOM and no Node, so everything outside it, from the clock to the UI, is reached through $.
That is the whole model. It differs from settings-based hooks, which run shell commands, and from skills, which are instructions; our hooks guide and skills versus hooks versus prompts explain where each fits.
Step 1: Lay out the folder
A mod lives in its own folder. Ours looks like this:
touched-files/
├── .claude-plugin/
│   └── plugin.json
├── hooks/
│   ├── hooks.json
│   ├── register.tsx
│   └── touched.test.ts
└── types/
    └── index.d.ts
Three of these are required: the manifest, hooks.json and the module. The types/index.d.ts file is needed because this mod keeps values in session state, and touched.test.ts is your safety net.
Step 2: Write the manifest
.claude-plugin/plugin.json names the mod and points at its type contract:
{
  "name": "touched-files",
  "version": "0.1.0",
  "description": "Shows how many files Claude has edited this session in a band above the prompt, and lists them with /touched.",
  "types": "./types/index.d.ts",
  "author": { "name": "explainx.ai" }
}
The author field is optional. claude plugin validate warns when it is missing, which is a good reason to add it before you share the mod.
Step 3: Point at your module
hooks/hooks.json is one line. It lists the module or modules the engine should load, with paths relative to the file:
{ "modules": ["./register.tsx"] }
Step 4: Declare your state
Mods remember things in $.state, which belongs to the session and survives reloads. Because the engine checks every key your module reads or writes, you declare them in a type contract, types/index.d.ts:
export type Touched = { path: string; count: number }

declare module 'claude-code' {
  interface PluginState {
    'touched-files': { files: Touched[]; isHidden: boolean }
  }
}
The key is the mod's own name. Two values live under it: the list of touched files, and whether the user pressed Hide. Declaring them means the validator can catch a typo in a state key before it becomes a silent bug.
Step 5: Write the module
Here is the whole of hooks/register.tsx. We will walk through it afterwards.
import { atom, read, update } from 'claude-code'
import type { Register } from 'claude-code'

import type { Touched } from '../types'

const files = atom({ plugin: 'touched-files', key: 'files' } as const, [])
const isHidden = atom({ plugin: 'touched-files', key: 'isHidden' } as const, false)

const short = (path: string) => path.split('/').slice(-2).join('/')

const bump = (list: readonly Touched[], path: string): Touched[] => {
  const seen = list.find(one => one.path === path)

  return seen
    ? list.map(one => (one === seen ? { ...one, count: one.count + 1 } : one))
    : [...list, { path, count: 1 }]
}

export const register: Register = on => {
  on('session.start', async ($, e, next) => {
    await $.command.register({
      name: 'touched',
      description: 'List the files Claude has edited this session',
    })

    return next(e)
  })

  on('tool.call', { tool: 'Edit' }, async ($, e, next) => {
    await update($, files, list => bump(list, e.file_path))

    return next(e)
  })

  on('tool.call', { tool: 'Write' }, async ($, e, next) => {
    await update($, files, list => bump(list, e.file_path))

    return next(e)
  })

  on('command.run', { command: 'touched' }, async $ => {
    const list = await read($, files)

    if (list.length === 0) {
      return { text: 'No files edited yet this session.' }
    }

    return {
      text: list.map(one => `${one.count}x  ${short(one.path)}`).join('\n'),
    }
  })

  on('ui.render', { component: 'AbovePrompt' }, async ($, e, next) => {
    const list = await read($, files)

    if (e.props.hasSurvey || list.length === 0 || (await read($, isHidden))) {
      return next(e)
    }

    const { Box, Button, Text } = $.ui.resolve(e)
    const last = list[list.length - 1].path.split('/').pop()

    return (
      <Box>
        <Text dimColor>
          Touched {list.length} {list.length === 1 ? 'file' : 'files'}, last: {last}{' '}
        </Text>
        <Button
          key="hide"
          label="Hide"
          onPress={() => update($, isHidden, () => true)}
        />
      </Box>
    )
  })
}
How it works, piece by piece
Atoms. atom(ref, initial) defines a value in $.state. You read it with read($, atom) and change it with update($, atom, fn). A write redraws anything that reads the atom, which is why the band updates on its own. The ref names the plugin and key, and has to match the contract from Step 4.
The session.start hook registers the slash command once, with a name and a description. The description is what appears in autocomplete. Notice that it ends with return next(e), so every other plugin's session.start hook still runs. Forgetting next is the most common way to break a mod's neighbors.
The two tool.call hooks fire whenever Claude calls Edit or Write. The matcher { tool: 'Edit' } narrows the hook to that tool and gives e the right type, so e.file_path is a string. Each hook records the file and passes the call along unchanged. We register two hooks rather than one because the matcher takes a single tool and the types stay precise.
The command.run hook answers /touched. It returns { text }, which Claude Code prints in the transcript. Returning without next is correct here, because this hook is the one that answers the command.
The ui.render hook draws the band. The matcher { component: 'AbovePrompt' } selects the slot above the input. $.ui.resolve(e) returns the elements, Box, Text and Button, for whichever surface is drawing, which is how one mod works on terminal and desktop. If there is nothing to show, the hook calls next(e), which leaves the slot to whatever else would draw there. The key="hide" on the Button is how tests find it.
The short helper trims a path to its last two segments so the /touched list stays readable.
Step 6: Validate it
Run the validator on the folder:
claude plugin validate touched-files
It reads the manifest and the module's source the way the engine will and reports what the module hooks, what it calls, and what state it reads and writes.
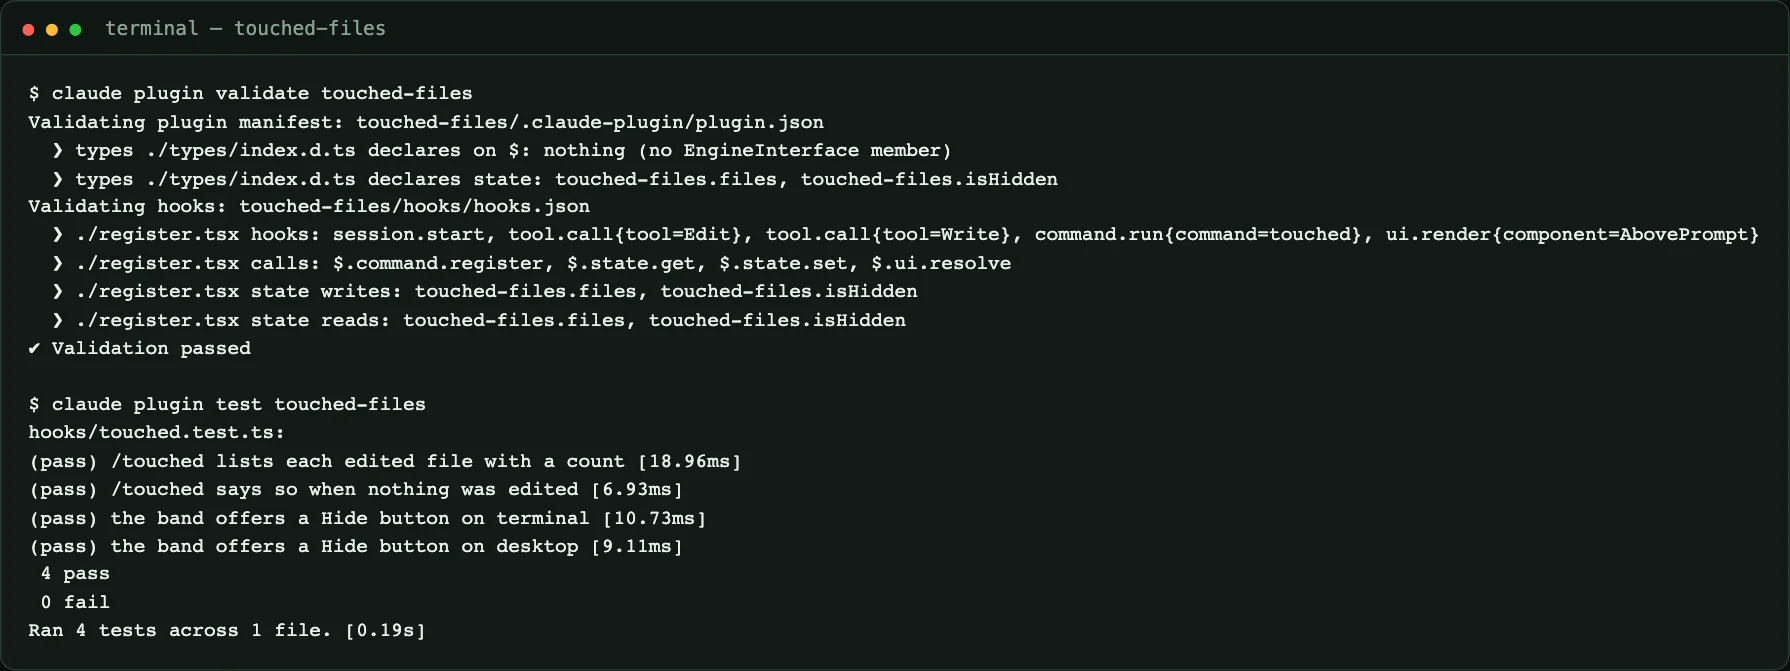
The output lists exactly what we intended: five hooks, the four engine calls, and the two state keys. If you misspell a state key, or read one you never declared, this is where you find out. The two lines about the types file are informational: the contract declares state but nothing on $.
Step 7: Write tests
A mod you cannot test is a mod you will be afraid to change. hooks/touched.test.ts runs against the engine itself:
import { expect, test } from 'claude-code/testing'

test('/touched lists each edited file with a count', async ($, on) => {
  on('tool.call', () => ({ result: {} }) as never)

  await $.tool.call({ tool: 'Edit', file_path: 'src/a.ts', old_string: 'a', new_string: 'b' })
  await $.tool.call({ tool: 'Write', file_path: 'src/b.ts', content: 'x' })
  await $.tool.call({ tool: 'Edit', file_path: 'src/a.ts', old_string: 'b', new_string: 'c' })

  const ran = await $.command.run({ command: 'touched', args: '' })

  expect(ran.text).toContain('2x  src/a.ts')
  expect(ran.text).toContain('1x  src/b.ts')
})

test('/touched says so when nothing was edited', async $ => {
  const ran = await $.command.run({ command: 'touched', args: '' })

  expect(ran.text).toBe('No files edited yet this session.')
})

for (const surface of ['terminal', 'desktop'] as const) {
  test(`the band offers a Hide button on ${surface}`, async ($, on) => {
    on('tool.call', () => ({ result: {} }) as never)
    await $.tool.call({ tool: 'Edit', file_path: 'src/a.ts', old_string: 'a', new_string: 'b' })

    const band = await $.ui.mount({
      plugin: 'touched-files',
      surface,
      component: 'AbovePrompt',
      props: { hasSurvey: false },
    })

    expect(await band.find({ key: 'hide' })).toBeDefined()
    expect(await band.find({ type: 'Text', text: /Touched 1 file/ })).toBeDefined()

    await band.unmount()
  })
}
Run them with claude plugin test touched-files. They are the four green lines in the screenshot above.
Three things that tripped me up
- The test has to stand in for the engine. In a test, nothing sits beneath your hooks, so a
tool.callhas no real tool to run. The lineon('tool.call', () => ({ result: {} }) as never)plays the engine's part. Without it, the test fails with "no implementation for tool.call." - Always unmount a drawing. My first version of the UI test passed its assertions and then failed with an unhandled rejection that said the drawing was unmounted. Calling
await band.unmount()at the end fixed it. - Await your finds.
band.findreturns a promise. Asserting on it withoutawaitalways passes, which is worse than failing.
The loop over ['terminal', 'desktop'] is worth copying. It shows that the mod does not depend on one surface, which is cheap insurance because the same mod can be drawn on terminal, desktop, the VS Code extension and mobile.
Step 8: Run it in a real session
Start Claude Code with your folder as a plugin directory:
claude --plugin-dir /path/to/touched-files
Ask Claude to create a file. When the turn ends, the band appears above the prompt.
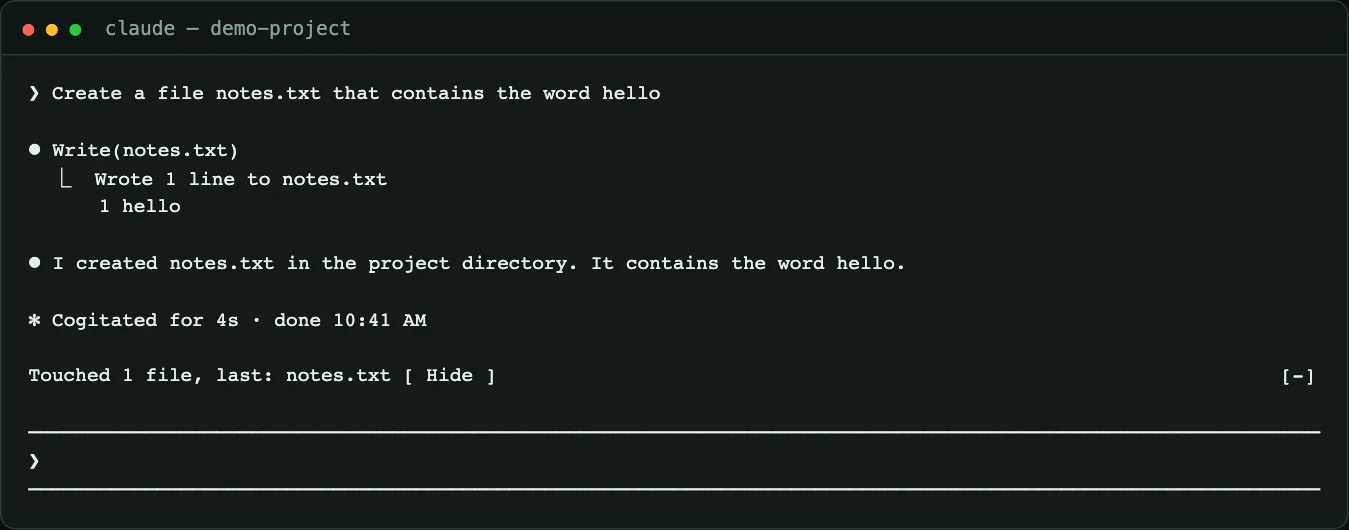
The line "Touched 1 file, last: notes.txt [ Hide ]" is drawn by the ui.render hook. The [-] at the right edge is drawn by Claude Code around the band, not by the mod's code.
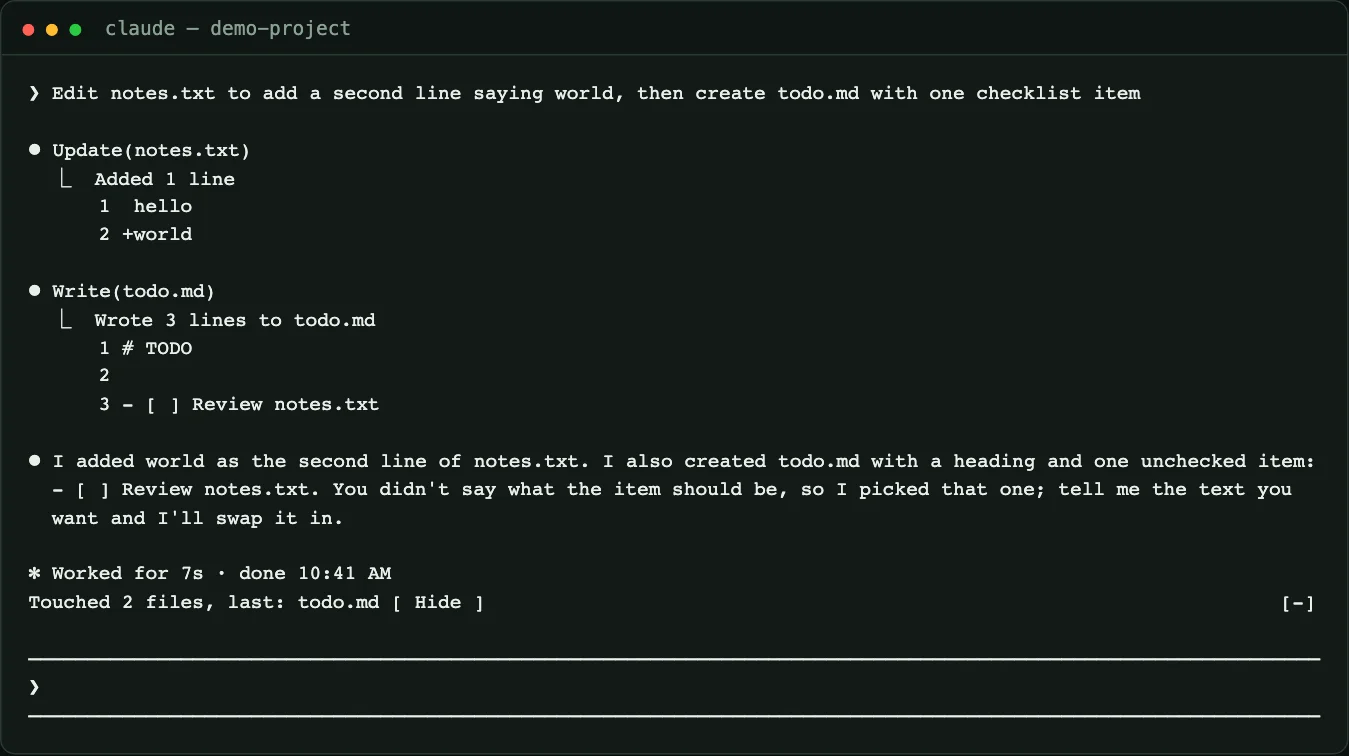
Now ask for more edits. In the next capture, Claude edits notes.txt with its update tool and creates todo.md, and the band updates to two files. Note that the transcript shows the edit as "Update," while the mod's Edit matcher caught it, since that is the tool's name inside the engine.
The slash command
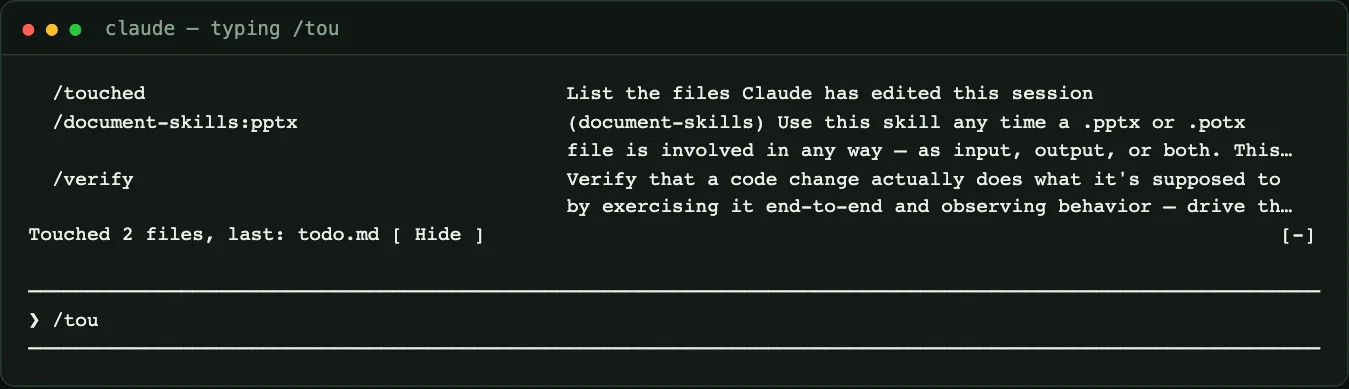
Type a slash and the first letters of the command. Because session.start registered /touched with a description, it appears in autocomplete.
Run it and the command.run hook answers with the list.
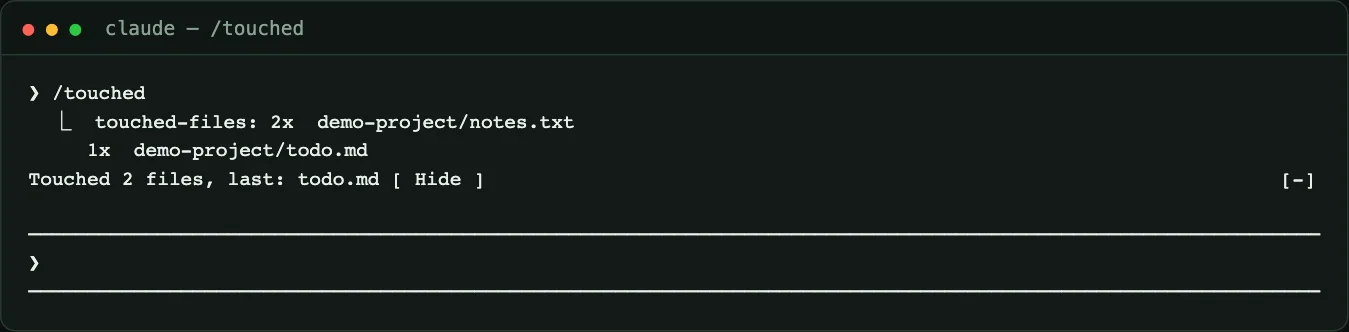
Claude Code prefixes the output with the plugin's name, which makes it easy to tell which mod spoke. The counts, 2x for notes.txt (written, then updated) and 1x for todo.md, match what happened.
The screenshots above are real captures from a Claude Code 2.1.288 session running this mod, rendered as images. The text is unedited and cropped to the relevant rows.
Step 9: Ship it
Once it works, share the folder. Our official plugin guide covers distributing a mod with the /plugin command, and the top plugins roundup shows what the wider ecosystem looks like. A few habits make a mod easier to adopt:
- Keep it tiny. One job per mod. The commenter's advice about disabling mods one by one only works if each mod is small enough to reason about.
- Put it in git. A mod that changes how your agent behaves deserves a history.
- Validate and test in CI. Both commands are non-interactive.
- Document what it reads. A mod runs with your Claude Code's access, so tell users what it touches.
Debugging checklist
When a mod does nothing, work down this list:
- Run
claude plugin validate. It lists the hooks it found. If an event you expected is missing, the hook did not register. - Check that every hook calls
nextor answers. A hook that does neither can swallow an event. - Read the dim transcript line. While a plugin folder is hot-reloaded, the transcript prints a line when a hook fails or a tree is refused, naming the plugin and the reason.
- Use the debug log.
claude --debugrecords every refusal and every result the engine rejected. - Run the tests. A failing test tells you more than a hunch.
- Reload by restarting. A reload is a fresh load of the module:
registerruns again and module-level variables start over, but$.stateis kept.
What people are asking
Can a mod block or change a tool call?
Yes. A tool.call hook can return { deny: 'reason' } to refuse the call, or call next({ ...e, command: e.command.trim() }) to rewrite it. Our guide to the Blast Radius mod shows a hold-before-run pattern. Remember that a mod is not a security boundary; see permission modes for the actual controls.
Do I have to write the code myself?
No. You can describe the mod to Claude and let it write the folder, then check the result with validate and test. Our official guide covers that shortcut, and the validation steps here are how you verify what it wrote.
Can I add a pane instead of a band?
Yes. A pane is opened with $.ui.open and drawn by a ui.render hook on the Pane component. A pane opened by something the user did, such as a command, seats at any width, while one opened unasked needs a wide terminal.
Is a mod the same as an MCP server?
No. An MCP server gives the model new tools over a protocol; a mod changes the client, its UI, commands and hooks. See what is MCP and what are agent skills for the neighboring concepts.
What can I build next?
Extend this one. Show the count in the status line with $.ui.status, add a toast when a turn touches more than ten files, or have /touched open a pane. Kurt Buhler's filetree mod, which shows files, Git status and where Claude is working, is a good example of where this kind of idea goes.
Honest limitations
- I built and tested this on Claude Code 2.1.288. The API is new and may change.
- I did not test the mod on the VS Code extension or mobile; the desktop and terminal tests only exercise the hooks and the drawing description, not the actual paint.
- I could not test pressing the Hide button in the automated test, because the redraw after the press raised an unhandled rejection; the button is verified to exist, and the hide behavior is a one-line state write.
- The mod counts the
EditandWritetools only. Edits made through shell commands are not counted.
Bottom line
A Claude Code mod is a folder with a manifest, a hooks file and a module. Touched Files shows the shape: attach hooks to events, keep state in declared atoms, draw with ui.render, answer commands with command.run, then prove it with claude plugin validate and claude plugin test. Start tiny, keep it in git, and extend it once it works.
Related on explainx.ai
- Claude Code mods: official TypeScript plugin guide
- Claude Code mods: Anthropic opens a community extension layer
- Claude Code hooks: automate actions on tool calls
- Skills vs hooks vs prompts: when to use each
- Claude Code commands: complete reference
- Claude Code permission modes explained
- Top 25 Claude plugins
- Loop engineering with coding agents
Built and verified on Claude Code 2.1.288 on October 3, 2026. The mod API is new; check current documentation before relying on details.
Update — October 3, 2026: Want ready-made mods to read or install? See awesome-claude-code-mods: 50 open-source, MIT-licensed mods to install.
Update — October 3, 2026: Using the desktop app? See Claude Code mods in the desktop app: install, build and test one.